Dell OS10 Basics Part 3
Dell OS10 is Dell’s latest switch operating system. It is built on a Linux core and is Dell’s offering in the Open Networking space. It is NOT intended as an upgrade for switches running OS6 (N-Series) or OS9 (legacy S-Series), however, any Dell S- or Z-Series switch with a “-ON” in the name can run OS10. OS10 is licensed separately from the hardware because it can theoretically be run on any switch that supports the Open Network Install Environment (ONIE). As I am writing this, the current stable version of OS10 is v10.5.1.1, and it is available on a majority of Dell Datacenter switches including the 1G S3048-ON, the 10G S41xxx-ON line, the 25G and 100G S52xxF-ON line, and the 100G and 400G Z9xxxF-ON.
In this series of posts about OS10 switches, I hope to give you some knowledge about how OS10 works, and how to configure some of the basic functions within OS10. Feel free to contact us if you have further questions about OS10 switches and networking, or if you would like assistance with configuring your OS10 switches.
NOTE: This series discusses OS10 Enterprise Edition which is licensed. There is also a no-cost Open Edition, which is just as powerful, but much more complicated to manage as it removes the switch-like command interface and requires you do everything with native Linux networking commands. For our purposes, OS10 refers to the Enterprise Edition, unless explicitly stated otherwise.
VLAN stands for Virtual Local Area Network. It is a logical extension (i.e. “Virtual”) of a Local Area Network (LAN) and is detailed in the IEEE 802.1Q specification. A LAN sits in the second layer, or Data Layer of the OCI model. Devices in a LAN are identified by their Media Access Control (MAC) address (aka physical address) and share the same broadcast domain. Any frame that is sent to the broadcast address will be broadcast (i.e. transmitted) to every device connected to the LAN. VLANs allow one switch to manage multiple LANs on the same hardware. This is done by adding a “VLAN tag” to the frame.
Switches use this tag to determine what VLAN the frame should be in. If the frame does not have a tag (referred to as “untagged”), it is transmitted in the “native” or “access” VLAN. If it does contain a tag, the frame is transmitted in the VLAN identified by the tag.
Ports on a switch can be configured for “access” to a VLAN – meaning that they will only transmit and receive frames in the VLAN they are configure for, and all the frames they transmit will be untagged. Ports can also be configured as “trunk” or “tagged” ports. This means they will transmit tagged frames into the specified VLAN (and sometimes untagged frames into the access VLAN). Trunk ports can (and generally should) be configured to only transmit packets with known VLAN tags.
VLANs are generally used to segregate different types of traffic without needing to invest in additional networking equipment. This can improve security, reduce noise on the network, and in some cases improve the performance of your network without additional hardware costs.
For example:
- You might separate your users from your servers using two VLANs. This would prevent someone connected to the user VLAN from discovering your servers using broadcast packets.
- You might separate systems that use a lot of broadcast traffic to function (such as vMotion, or many VoIP solutions) from your primary user/server traffic to reduce the amount of packets your primary devices receive, and conversely, to prevent all the normal broadcast traffic from interfering with the processing of the broadcast frames that are required for the special application.
- You might separate different user types (say finance and developers) from each other to protect the ability of those users to function. If the developers do something that messes up their network while testing a new feature, the finance team is more likely to still be able to process your paycheck.
Now that we have a shared understanding of what VLANs are, and how they might benefit you, how do you, as the network admin, make it happen?
NOTE: See the manual, or the previous article in this series for an explanation of the different context/prompt levels.
First, you need to create the VLAN(s) you will be using (this may already be done).
To view the VLANs that are already specified on the switch, run the following command at the execution prompt:
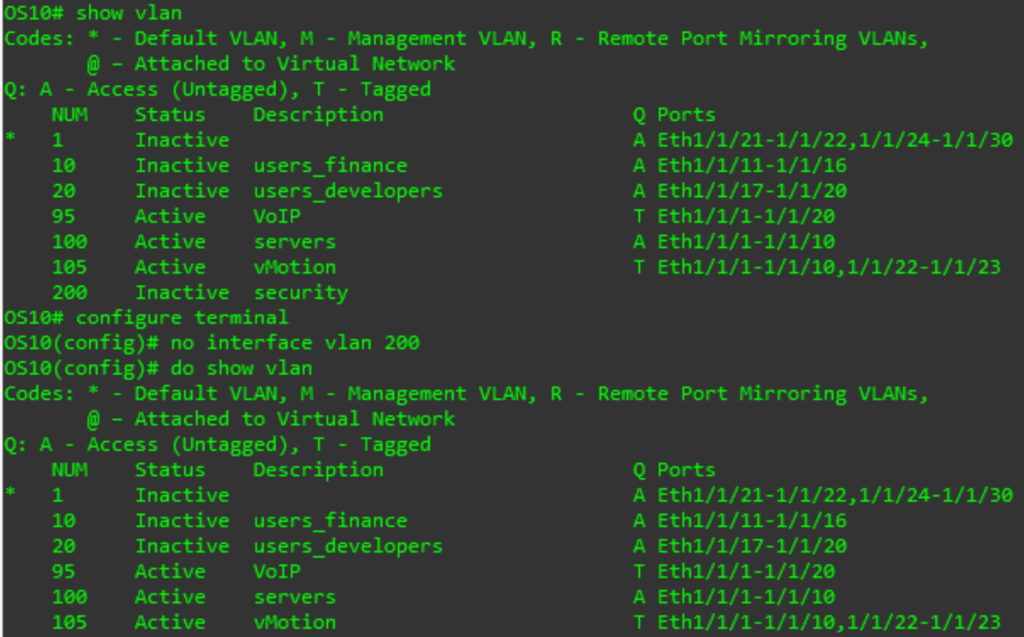
show vlan
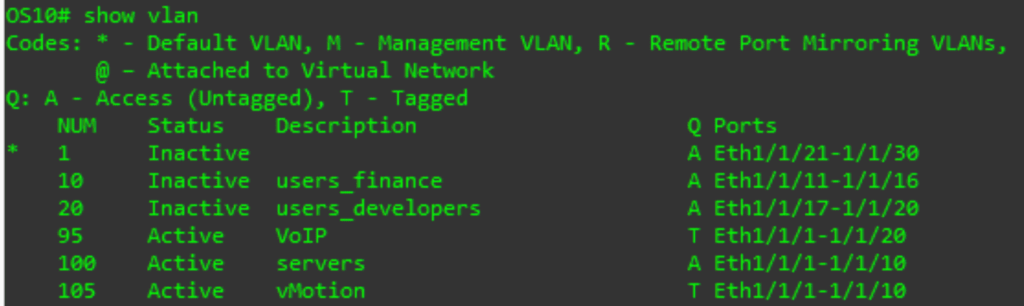
The output indicates that we have 6 vlans. It also shows which ports on the switch are in which VLANs, and in what way (A for access or T for trunk).
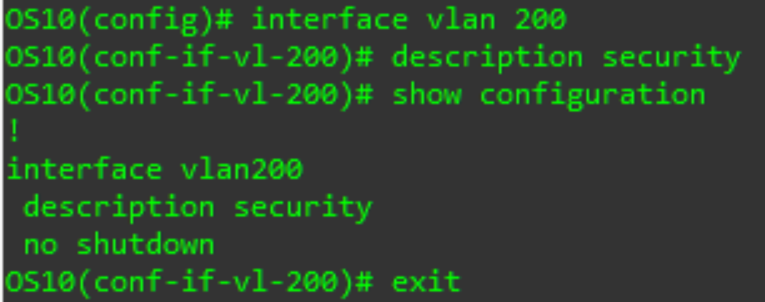
To create a new vlan (or modify an existing one), use this command from the configuration prompt:
interface vlan X
# X is the VLAN ID – a number from 1 to 4094
You are now in the VLAN interface sub-configuration. At a minimum I recommend specify a description of what type of traffic this VLAN will transmit so you can remember it the next time you look at your switch config. From the interface level, enter:
description XYZ
#XYZ can be a single word (i.e. VoIP, or Legacy_Users) or a phrase in “” (i.e. “Building 1 Users”)
We can confirm our VLAN configuration with
show configuration
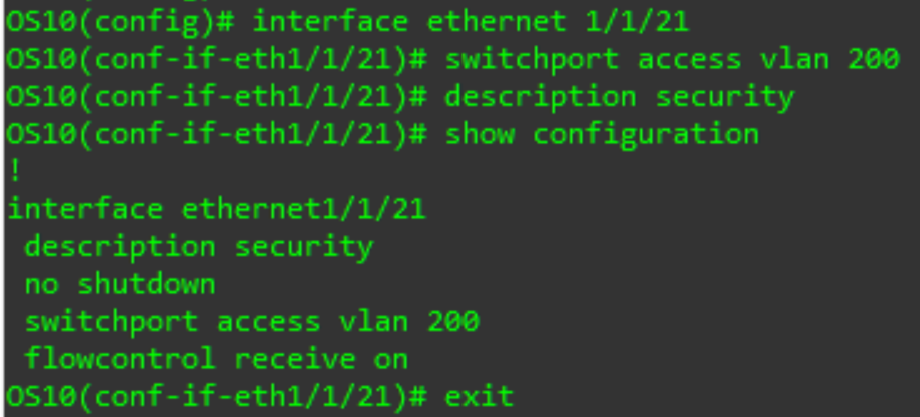
Now we need to return to the configuration prompt to configure a port to use the new VLAN. Type the exit command.
Back on the configuration prompt, we enter the interface port configuration (we will use an ethernet port as an example, but you could do this other port types as well, or even a range or ports).
Interface ethernet X/Y/Z
# X is the switch number (usually 1), Y is the module number (usually 1), and Z is the port number
First, we will configure a port for access mode:
switchport access vlan X
# X is the VLAN ID
We can also enter a description for the port using the same command we used for the VLAN above. Once done, validate the config with the show configuration command, then exit back to the configuration prompt.
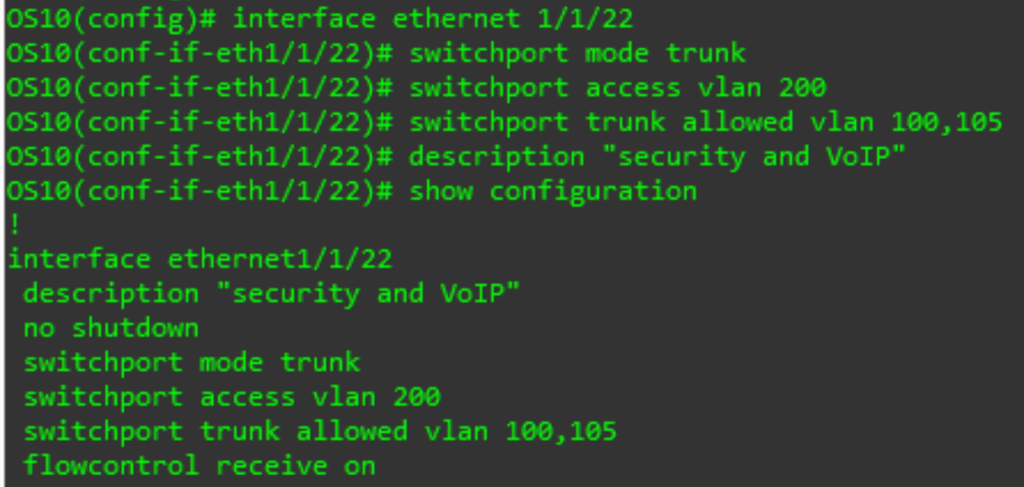
Now let us configure a port for trunk mode. Enter the interface prompt for another port (see above). Then enter the following commands:
switchport mode trunk
To specify the native/access/untagged VLAN:
switchport access vlan X
# X is the VLAN ID
To specify which tagged VLANs to accept:
switchport trunk allowed vlan XYZ
# XYZ can be a single VLAN ID, a list of VLAN IDs (i.e. 2,10,500,4021), or a range of VLAN IDs (i.e. 10-15)
To remove the access VLAN (which will require all traffic to be tagged) us the no form of the same command:
no switchport access vlan
To remove a VLAN ID or IDs again use the no form:
no switchport trunk allowed vlan XYZ
# XYZ can be a single VLAN ID, a list of VLAN IDs (i.e. 2,10,500,4021), or a range of VLAN IDs (i.e. 10-15)
Enter a description if desired, review the configuration with show configuration then return to the configuration prompt.

To remove a VLAN (which will remove it from all trunk ports and switch access ports with the VLAN back to the default VLAN on the switch) use the no form of the command from the configuration prompt:
no interface vlan X
# X is the VLAN ID – a number from 1 to 4094
Once you have everything configured the way you want, be sure to run
write memory
![]()
From the execution prompt to save the updated configuration.
There you have it. Now you know how to configure VLANs on an OS10 switch. Maybe in a future post we will discuss how you can enable routing on your OS10 switches to allow inter VLAN communication. For now, check back for the next post in this series where we will discuss increasing the redundancy and performance of your switches using LAGs or Port-Channels.
Click here to read part 2!
