This was a fun little project and something I just couldn’t let go of. Like most of you reading this blog I’m a fan of computer science and one of the things I like most about it is the instant gratification of making something work in my lab or in the field. The science part comes in when you don’t know quite how to do something, so you start changing variables one at a time and documenting the results. This post is in part an introduction to Linux, but also a description of a project I completed for a client who wanted to simulate load on their newly installed Linux server environment. They had been burned before and needed baseline comparative performance metrics to prove the WTG-provided solution was going to meet expectations.
Iometer is a very popular load generation, disk I/O and networking throughput data collection tool.
-
- The types of data you will collect from Iometer are fundamental disk and network parameters including:
- I/O (number of input-output operation per second)
- Throughput (amount of data that is being transferred)
- Response time (how long the computer system waits for a reply).
- A word about performance:
- Often in performance testing response time is king, performance is all about perception and that may seem counter-intuitive, so I’ll explain. If your user base or application owners don’t feel like there is a problem, then there isn’t one. Often performance is relative and if you receive complaints about a system running slow you must validate and document your findings to either justify the cost of upgrades and technology changes or exclude these computer systems as a cause of the performance issues. Nowadays if you must wait for more than 4 tenths of a second for something to load then you’re on the phone to the support desk. If you think you have a performance issue response time is where to start.
- The types of data you will collect from Iometer are fundamental disk and network parameters including:
If you have landed on this page because you just want to test i/o on Linux here are a couple of links to help you do just that, using stress and iotop are tests you can run in minutes.
- How to Benchmark Disk I/O
- Using Stress and monitoring with iotop
- This article also lists how to test and monitor CPU, Memory, and GPU’s.
Why do this at all?
The real genesis of this project was a customer request and having used Iometer in the past I decided that was the load and reporting tool I wanted to leverage. I also needed something that could run on many flavors of Linux, Ubuntu, CentOS, Redhat, etc. What I quickly found out is that you can’t run Iometer directly on your Linux host. Iometer is two tools, a load generation engine called Dynamo and the management interface that we know as Iometer. Dynamo can run on almost anything while the Iometer graphical interface will only run on Windows. After a quick search, I found several links to help me set up Iometer on my Windows desktop and deploy Dynamo on my Linux server. The links helped but like any good project it wasn’t just following directions, there were little challenges along the way, and I learned a few helpful Linux commands I wish I had known all along. Without further preamble here is the process for load testing on Linux with Dynamo and leveraging the Iometer GUI to set load parameters and collect results.
This is also a great little lab to interconnect your Windows desktop with your Linux server environment.
I need a Linux boot disk (for those of you that need to build a simple Linux Server/Desktop)
Installing Iometer on Windows (logon to your windows desktop and install Iometer)
- Find your version of Windows and install Iometer (Iometer Downloads)
- Launch Iometer, you will need it running to let Dynamo connect
Logon to your Linux server and install Dynamo
Installing Dynamo can be a little bit of a challenge if you’re not working in Linux often, I’ve tried to supply some guidance and some troubleshooting tips.
- Download Dynamo as a package. (link to download tar file for Linux Download Iometer Linux) If you click this link on your Linux server it will automatically download into your downloads folder.
- Remember Linux is context-based so you will need to be in the folder with the downloaded file to unpackage and run the commands
- Unpack archive (should be a .bz2)
- bzip2 -d iometer-1.1.0-linux.x86_64-bin.tar.bz2
-
-
-
- unpack the tar
- tar xvf iometer-1.1.0-linux.x86_64-bin.tar
- unpack the tar
-
- Test to see if you can run dynamo
-
- sudo ./dynamo
-
-
-
-
- You need to test the Dynamo install because it often requires additional packages
- If everything worked great skip down to the run Dynamo section
- I’ve never had all the packages required to run dynamo after my initial download (this is the real catalyst for this article I wanted to make it easier for folks trying to have fun learning Linux and what’s more fun than performance testing.) If you go it installed but can’t run it jump to: How to locate and install missing packages
-
-
-
<strong\>Install Dynamo alternate method
- (32 Bit )The easiest way is to paste this command into your Linux command line “wget http://downloads.sourceforge.net/project/iometer/iometer-stable/2006-07-27/iometer-2006_07_27.linux.i386-bin.tgz”
- Unpack the archive
- “tar xvzf iometer-2006_07_27.linux.i386-bin.tgz”
-
- Change directory to by running the following command
- “cd iometer-2006_07_27.linux.i386-bin/src”
How to locate and install the missing packages
- ldd ./dynamo
- the ldd command list the packages you need to run a specific program (I was missing two packages, libaio1 and libstdc++
- install missing packages
-
-
-
- sudo apt-get install libaio1
- sudo apt-get install libstdc++
-
-
- *note you may be missing additional packages a quick search will yield the right package name to install if it’s not evident form the ldd output
- Also depending on your flavor of Linux the install commands may be slightly different. I’m using the Bash shell commands on Ubuntu 16.
Run Dynamo
- sudo ./dynamo -i IOMETER_HOST -n IOMETER_MANAGER_NAME -m DYNAMO_HOST_NAME _ (these directions are available in a few places, please keep in mind I’ve altered them to work on an Ubuntu test system)
- credit where credit is due, https://cstan.io/?p=8850&lang=en https://kb.netapp.com/app/answers/answer_view/a_id/1033146/~/how-to-use-iometer-with-linux-
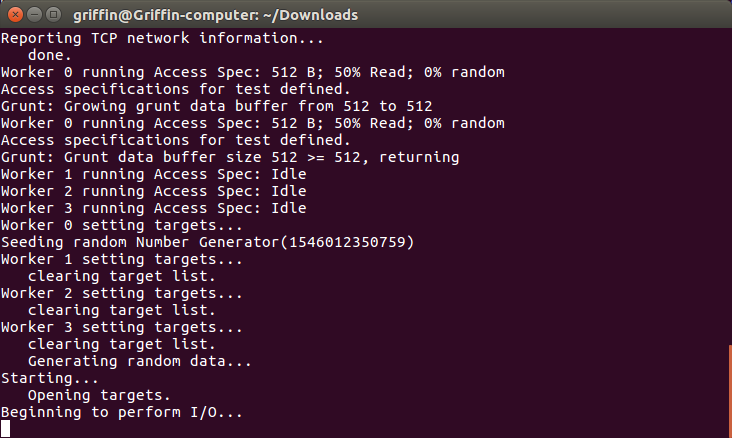
- here’s an example of the correct output you would see if you correctly ran Dynamo (see image below)
- IOMETER_HOST is the name or IP of the Windows Iometer station
IOMETER_MANAGER_NAME is the manager name in Iometer, can be anything (this is the linux host)
DYNAMO_HOST_NAME is the name or IP of the Linux host using Dynamo
If you have successfully installed Dynamo and got it running, you should get this output (see image): the I/O engine has successfully been installed, notice the workers are idle, and not generating I/O.
Congratulations all the hard work is done!
Validate your Iometer station can see your Linux host
Go back to the Windows system with Iometer and verify that the new manager was created.
You should see a new device under managers with 4 workers associated with it.
-
- The Iometer Manager Name should appear in the Iometer GUI
- If you are having trouble connecting, try turning off your Window and Linux firewalls
- How to turn off your windows firewall
-
-
-
- Type firewall into Window 10 search
- Click turn Windows Defender Firewall on or off
- Turn off Window Defender Firewall (I’m assuming you are performing these tasks in a secure environment)
-
-
- How to turn off your Linux firewall
-
-
-
- sudo ufw disable (works for Ubuntu)
-
- If you can see the Iometer_manager name but no disks then you may have run the ./dynamo command without administrative privileges, try it again with sudo and input your password
- Do not try this on a wireless network it won’t work for obvious reasons!
-
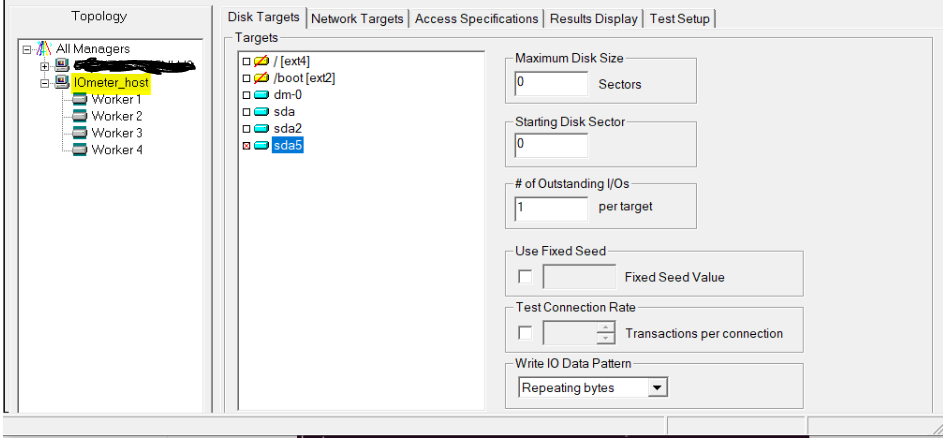
- Your Iometer GUI should look like this now. I highlighted the Linux host (named “IOmeter_host) which appeared when I ran the ./dynamo command.
Before we start the load testing
Before we dive into the load testing, we should do a little prework and make sure we can see what’s happening and that we are testing the right disk resource.
Why did I choose partition 5? I choose partition 5 because It represents the disk and partition of interest to me. (SCSI device/disk A, partition 5)
If you want to test a specific device use lsblk on your Linux server to list the partitions. You can tell the disk of interest by the size and consumed capacity.
The lsblk command creates a tree listing the devices, partition size consumed capacity and percent consumed.
- Let’s identify the disk/partition of interest on our Linux server using lsblk Linux command
- lsblk (command to enumerate disks and partitions)
- We should also run some type of Linux monitoring so we can see what is happening to the Linux host as well as collect the data in Iometer.
- For this we will use iotop, iotop lets you see in real time what is happening from an I/O perspective in Linux.
- Iotop install command
-
-
-
- sudo apt-get install iotop
-
-
- Run iotop
-
-
-
- Iotop
-
-
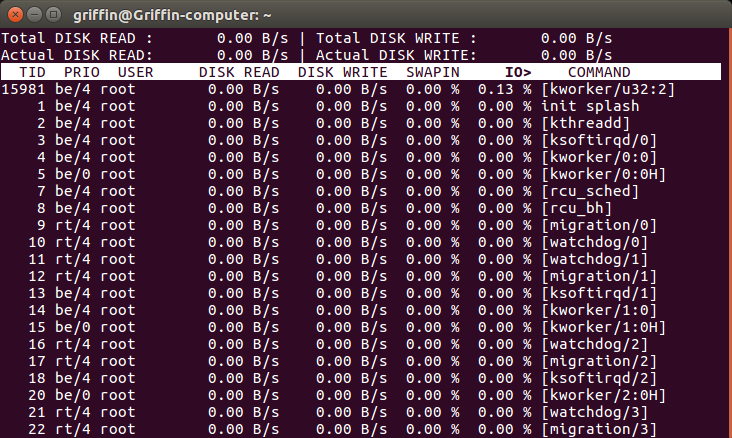
Here is what iotop looks like while not running a load test. Notice the disk reads and write bytes are at zero.
Running Iometer:
Running Iometer and testing different load scenarios is a deep subject if you landed here I’m assuming you’re familiar with Iometer (just in case here’s a link to some documentation and user guide).
For the sake of this project, I’ll assume you can figure out how to start a quick test using Iometer with a few hints.
As mentioned earlier you want to select your partition of interest and define access specifications.
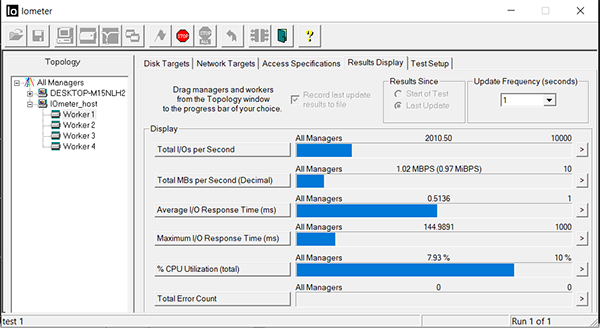
Access specifications are the workload profile for example 50% reads 50% writes with a 4KB block size. Once you’ve selected a worked and a profile you just hit the green flag and away you go. You can see the workload being generated by going to the display results tab in the Iometer GUI. (see image below)
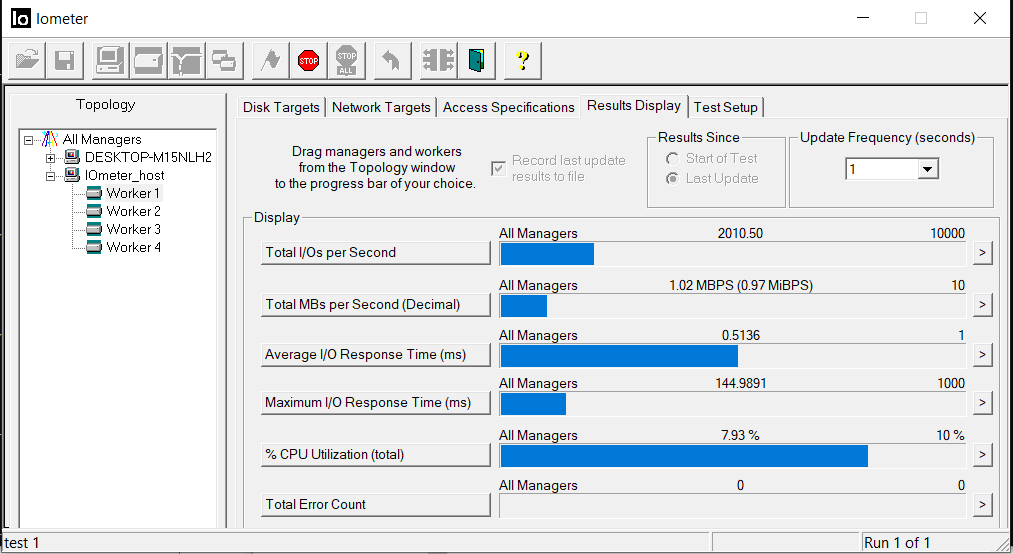
The above image details that I’m generating 2010.5 iops per second with an average response time of .5136 ms so about half a second, which is a good response time for my legacy hardware.
My bandwidth is currently 1.02 MB/S.
Often you are using Iometer to:
- Model a system that you are having an issue with
- Create a baseline for your environment (as a comparative for later, or to put guard rails around a workload)
- Test the limits of the system (perimeter testing, see how hard you can push it before it breaks, in my opinion, the most fun)
- Validate a given disk subsystem will support an expected workload
Iometer will save all data by default as a CSV file.
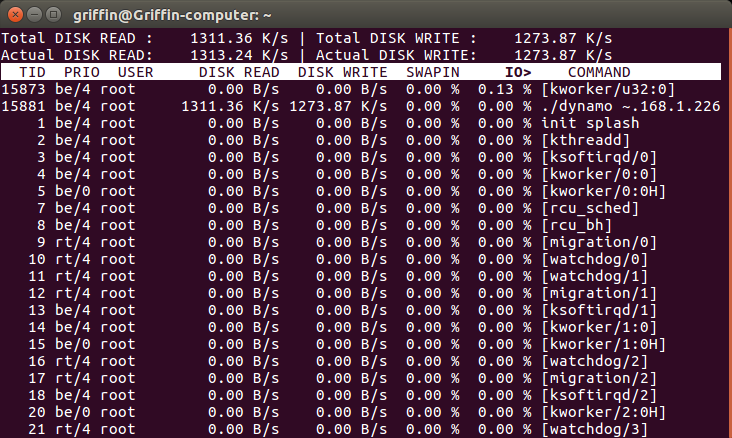
You should also see the workload locally on your Linux server via the iotop command (see below), notice the reads and write are now being exercised at 1311 KB/s and 1273 KB/S respectively.
You might be wondering why the Iometer GUI is reporting 2010.5 iops and iotop running on my Linux server is showing almost no disk I/o.
The answer is I took this image very quickly after starting my Iometer test resulting in all the i/o being serviced via cache.
The I/O percentage would have changed over time.
Closing thoughts:
I hope you’ve enjoyed this tutorial and if you were using this as a fun project to learn some Linux, I applaud you.
If you don’t have a Linux host but want to try this anyway I’ve included a section about how to build a Linux bootable thumb drive.
It’s super easy to make your own bootable thumb drive and you’ll have a nice little Linux machine to mess around with..
Iometer Landing Page
If you haven’t used Iometer it’s a good idea to visit their site and look around. (www.iometer.org).
How to build a bootable Ubuntu thumb drive:
-
- If you don’t have a Linux server and want to build a simple test system, I’d recommend Ubuntu
- A bootable Linux thumb drive is an easy thing to make and comes in handy for re-tasking old hardware that can’t run the latest version of Windows.
